


When I announced project late model restoration, I mentioned the badly worn front suspension as one of the main things that needed attention. Truth be told, the state of the suspension was really the catalyst for starting this project.
Married 12 years to a loving and patient woman.
Father to 3 very energetic boys.
Addicted to cycling.
I do geeky stuff with machines, electronics, and computers.
When I announced project late model restoration, I mentioned the badly worn front suspension as one of the main things that needed attention. Truth be told, the state of the suspension was really the catalyst for starting this project.
One of RightScale’s key differentiators from other cloud management platforms is the concept of the ServerTemplate.
A ServerTemplate is like a blueprint of the server you want to launch in the cloud. It defines things like what software and services will be installed and configured, what will be ready when the server boots, and what can be run periodically for maintenance during the lifetime of that server instance.
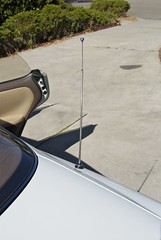
So there I was, minding my own business, driving the Lexus from point A to point B. When I arrived at my destination, I turned off the ignition, and as it had done thousands of times before the power antenna began reeling back into the rear fender, but then it happened… I heard a horrible CLUNK, then a persistent grinding sound that simply wouldn’t go away.
I tried turning the ignition back on, hoping that the antenna might have only slipped on one tooth and cycling it would get everything back on track, but it was not to be. With the antenna stuck just a little past half way erected, I removed the trunk interior panel that covers the power antenna motor, and disconnected the power.
On another, completely different occasion I was pulling out into traffic on a fairly busy four lane street. The maneuver I was attempting was a left hand turn which requires crossing the two lanes which I can see fairly well, entering the oncoming traffic in the furthest two lanes, which are obscured by a neatly manicured and lanscaped island.
As you might imagine, this is usually a bit of a hail mary manuever and you want to do it as quickly as possible so that you have the chance to react if you happen to be pulling into traffic which you couldn’t see. I pulled across the first two lanes, reving to the redline in first gear, and quickly looking over my shoulder to check for traffic as I merge and briskly pull the shifter down into second gear. Only, this time was… different… I engaged second gear, but the shifter traveled WELL past the point it should have then felt limp and.. well.. broken!
After a minor panic attack, and some experimenting with shifting in and out of various gears, I discovered that the odd numbered gears (1,3,5) still engaged normally. But, the even gears (2,4,Reverse) had this same “limp” feeling, though I was still able to engage them.
I drove the car for many, MANY months with both of these problems but I’ve recently remedied both of them as part of my “Late Model Restoration” project. Here’s how.
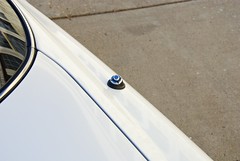
This one was easy, replacing the power antenna mast is both inexpensive and easy. I bought a replacement mast on eBay for under $20, and replaced it in about an hour. It would have taken less time if I had paid closer attention to the directions and installed the outside decorative nut in the right order. Ohh well!
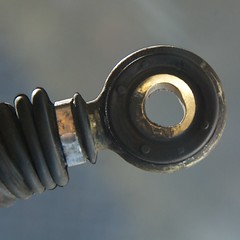
The result, however, is well worth the effort. The shifter feels perfect now. Very positive tactile feedback, I know when I’ve engaged a gear. It’s easily “better than new” with the solid bushings and the factory fresh cable. While replacing the cable may not have been expensive (it’s a > $200 part) and not immediately necessary it’s worth the peace of mind knowing that it’s new and I’ve got at least another 18 years before I have to worry about it again.
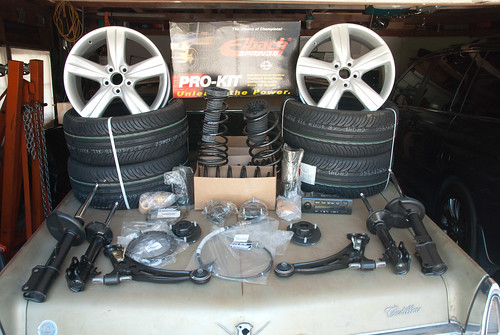
Stay tuned for more of the Late Model Restoration, the suspension is next, and here’s a little teaser!
Whether you are a small development company with a tight budget, or an established enterprise with some trepidation about wading into the murky waters of cloud computing, RightScale just made it easier to empowering your development and test teams with cloud computing.
In late September RightScale announced a Development and Test solution pack. This solution pack is a suite of tools, best practices, and professional services that helps deliver the agility promised by the cloud to your development and test phases.
CM Crossroads interviewed RightScale’s CEO Michael Crandell about the new offering and has recently made the interview available.
If you want to know more after watching the interview, checkout the RightScale Dev and Test Solution Pack landing page for more info.
It’s now the end of my first full week back at work since I attended the 2010 Cloud Expo and RightScale User Conference, and I’m still feeling the motivation and enthusiasm I picked up there.
As I was clearing out my RSS reader a few days back, I stopped to read a post on the Flickr dev blog about the “new” 640px image size. In the article they lament that they wished they had made “Large” copies of all uploaded images because it would make generating the new 640px size easier.
This got me thinking, what if they did want to convert every image ever uploaded to this new size and cache it? How would they do it? How much would it cost? The more I thought about it, the more curious I became, so I launched a little research project to see what I could find out, and to show how I would work through the problem.
I tried searching to find out exactly how Flickr is resizing their images, but it is apparently a well kept secret. There was a fair amount of speculation that they use Lanczos resampling, and my own research suggested it was a strong choice for quality resizing, so I chose to use it for the purposes of this experiment.
I wrote a very quick PHP script that uses ImageMagick with the Lanczos “filter” to do the work. This resizer was built with this particular experiment in mind, but it is fairly flexible. If you POST an image, and a value “largestDimInPx” it will resize the image and send it back as the response to the HTTP POST, thus the “RESTFul” name. The resizer also accepts an array of parameters which it sends back in the HTTP header. So if you were actually taking on a mass resizing project like we’re proposing, you can pass the unique ID of the photo in your system and get it back when the resize is complete.
You can find the code for it over on my GitHub.
Another carefully guarded secret it seems, is the total number of images that Flickr is currently hosting. I did a lot of searching and tried a few naughty tricks to see if I could get the API or website to tell me, but it was to no avail.
Some previous “official” numbers were as high as 6 billion images. So for the purposes of my test I assumed that they had 10 billion images that they wanted to resize to this new 640px image size.
I have to assume that Flickr has a pretty impressive infrastructure built out, and that they have a huge amount of processing power at their disposal. Still, to accomplish something like this it’s unlikely that they’d reallocate existing resources. The task is too monumental to just have a couple servers work at it.
I also have to assume that they’re carefully optimizing their servers so that they don’t have to build and maintain more than necessary. So that begs the question, how do you get the processing horsepower necessary to convert all of these images?
Since I’ve recently been engrossed in creating and refining reusable RightScale ServerTemplates for our own servers in the AWS cloud, my thoughts for a solution instantly gravitated toward launching a bunch of servers in the cloud for this purpose then terminating them when the task was done. What I didn’t know is if this made more sense than, say, buying a bunch of servers and configuring them to do the same task.
In order to do some tests, I created ServerTemplate which can be launched on AWS using RightScale that will immediately be able to start resizing images posted to it using my aforementioned PHP resizer.
What I learned in short was… This is a HUGE undertaking! I also found that while any approach would probably be cost prohibitive, performing this resizing task using on-demand servers in the cloud is still the cheapest route by far.
First, some of the assertions for this exercise.
You’ll also find that as I describe the results, and the costs they represent, I conveniently exclude data transfer from my numbers. This is actually intentional. My goal is to compare just CPU time.
Yes, bandwidth has a tangible cost when you use it in the cloud. But the same is true for a bare metal server doing the same task, not to mention the networking hardware which must be acquired, configured, and maintained. So for the purposes of this experiment, only the cost of CPU cycles is really being examined.
With my new m1.large instance launched in the AWS cloud, and exposing the resizer service, I did a few tests to get a feel for just how long it would take to do all of this resizing. What I found out pretty quickly was that the actual task of resizing the image actually only took around 1 second, sometimes less! It should come as no surprise that the real time consumer in the process was I/O bandwidth.
Over my home cable connection (measures at 3.5Mbps up and 11.83Mbps down), using Firefox to post and FireBug to measure, it took an average of 12 seconds to complete the process of posting the image and receiving the response. If I removed the overhead of Firefox and simply used a bash script and cURL, that dropped considerably to 8 seconds.
In an effort to get a “best case scenario” measurement, I copied the file to be resized onto the AWS instance, and ran the same cURL command locally. On what can be effectively called “infinite” bandwidth, the process of posting, resizing, and fetching the result took about 2 seconds.
One very tangible benefit to using the cloud for this purpose though is the time to market for such a huge task. You can imagine that if Flickr did decide to go ahead with this, they wouldn’t really want to announce that they’ve started but that the process will take many months, or even years. Assuming again that the per image resize time is 2 seconds, it would take one server just over 633 years to convert all of the images. Something tells me that wouldn’t exactly go over well.
Say that they wanted to convert all of the images in one week, at 2 seconds per image for 10B images, it would require just over 33,000 servers to convert that many images in the cloud. What’s more is that it would take effectively “no time” to deploy that many servers, use them for a week, then terminate them. Try rolling out that many real, bare metal servers in that timeframe!
You might look at those results and think that these times are fairly reasonable. However, if you take these figures and start multiplying them by ludicrously large numbers (like 10 billion for example), those reasonable numbers start to look very unreasonable.
Using these results, and (as I stated before) only accounting for CPU time, it would cost approximately $1.9M for Flickr to convert all of their images in the cloud. That is assuming that they’re connecting to the servers with effectively infinite bandwidth, ensuring that the upload and download transfer times for the image were less than 1 second (combined!). Seems like a lot of money, but then it’s a lot of images!
Compare that though, to building out a farm of bare metal servers to do the same task. We’ve already established that we’d need a little over 33,000 servers to be able to convert all of the images in a week. If we just take the lowest configuration Dell rack mounted server, the R-415 at a retail price of $4531, it would cost just over $149M, just for the hardware. Worse still, the Dell doesn’t actually have as much processing horsepower as an AWS m1.large does, so you’d probably significantly effect the time per image.
At the end of the day, any approach for converting all of those images would be cost prohibitive, and I’m betting Flickr won’t be taking on this project. Still, if I had to accomplish this task for real, I think I’ve demonstrated fairly convincingly that doing it in the cloud with on demand computing power is totally the way to go.
I’m not a mathematician or a statistician, and I did paint this topic with very broad strokes. You can check my work with the simple Google Spreadsheet I created to track my results. If this were an actual task, I’d be a bit more precise, but I wanted to show the differences between the approaches, without getting into too much minutia.
That said, discussion about factors I may have missed are welcome, I think you’ll find that the delta in price for just the CPU horsepower between the cloud and a bare metal solution more than absorb any real differences I may have excluded. ;–)
RightScale is definitely doing the whole “social media thing” right. They’re active on Twitter and Facebook. The CEO blogs, they have a community forum and the very nature of their product encourages users to interact and share with one another. Clearly they’ve ticked all of the big social media checkboxes, but their latest announcement is sheer evil genius!
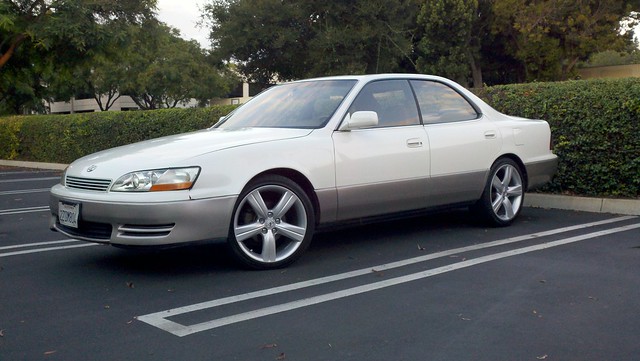
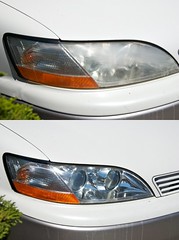
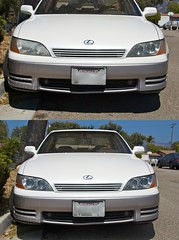
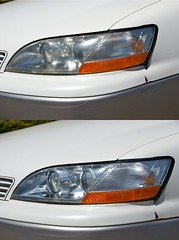
 A common affliction to older cars is that the headlights begin to become dull, or yellow over time. This had happened to our 1992 Lexus ES300 pictured above. To be fair, the passenger headlight is a little cloudier since I had done a little bit of wet sanding before I took the photo, more on that later though.
I am going to describe the process I used to restore the yellowed and oxidized headlights, but with that comes the disclaimer. This process is not advised, I can not be held responsible if you void your warranty, destroy your headlights, starve your dog, or burn down your house. Your mileage may vary..
 There are lots of “all-in-one” headlight restoration kits which have different materials and chemicals in them, and they all will work to varying degrees. However, I wanted to take the DIY approach. There are many other how to’s and lots of opinions about how this is done, I chose to wet sand to remove the oxidation then spray a few coats of clear and wet sand and polish again til nice and shiny. Here’s how I did it.
First, I wet sanded the lens with a 1500 grit paper. I used a spray bottle filled with water and maybe a quarter of an ounce of dish soap, and made sure to keep the lens nice and wet while sanding. Sand just enough to get rid of the yellowing, and get a uniform surface.
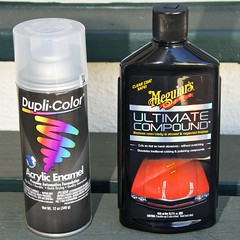
The next step was to spray on three coats of Dupli-Color Acrylic Enamel from an aerosol can. I followed the instructions of doing two light coats, then one medium wet coat, each coat separated by 10 minutes.
Then, I put two sheets of 2000 grit paper in a water and dish soap solution to soak overnight. After letting the paper soak and the paint dry over night, I used the same wet sanding process on the clear coat with the 2000 grit paper. I sanded until almost all of the orange peel was gone, but left it a teensy bit wavy so I had some material to remove in the last step.
In the last step I used some Meguiars Ultimate Compound for buffing. This buffed away the last of the orange peel and left a nice smooth shiny surface.
That’s all there is to it, and here’s the results!
Dear Music,

First I must apologize for our lack of visits, I’ve been so busy running around taking care of my sweet baby boys, husband and home. I can’t believe it’s been so long since our last visit, you know a real visit when we can just sit and enjoy each other’s company. I know we were making regular visits before my second blessing arrived and we were really making strides while I listened to my heart beat, felt my breath fall in step with you and my foot steps as I enjoyed the early morning air. I’m sorry for not making you a bigger priority. I promise to make a bigger effort, after all taking the time to shut off my television and grooving and singing along with y’all makes me smile, laugh and giggle.
It’s amazing how a little Common, JayZ, Jill Scott, Mos Def can make me smile, shake my groove thang, and remember that life is fun to a beat. I love it when life slows down a little more to enjoy some Sara Vaughn, Billie Holidae, Ella Fitzgerald. Or the fun times to have pretending to be a supreme or one of Gladys’ Pips, in my bouffant sequence covered day dreams. Stevie, you just remind me of my childhood and make me want to cry while I sing along, reminding me of the good and sad times.
I love listening to India Arie and Erika Badu and I’m reminded that my afro, big booty, dynamite self is fantastic and amazing. Pink, Duffy, and even you Amy, remind me of all the angst and pain in life that is somehow is made better by a great song to sing or scream along.
Music, what I’m trying to say is I miss you and I promise to visit more often. I also promise to start the expose the baby boys to their slightly embarrassing mama trying to teach them about the joys of every kind of music she can stand, even the country music that your papa doesn’t have to know about. ;–)
Thank you music and we will be talking again soon, very soon.
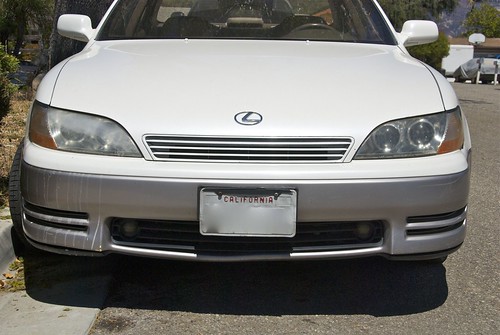
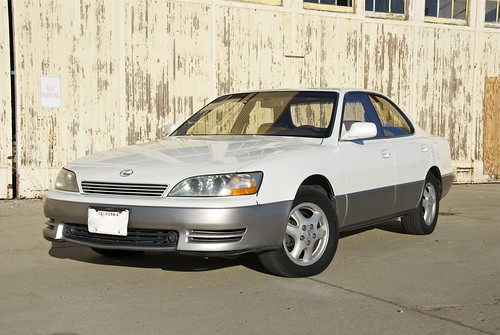 I’ve written a fair bit about my 1967 Cadillac but I haven’t said much about my daily driver. Every day, I drive a 1992 Lexus ES300 to work and back. The car actually belongs to my wife, but since she’s usually home with the kids the van stays with her. The Lexus is actually quite rare since it has a manual transmission. They only put 5 speed manuals in the Lexus ES300 for a few years, and only a very small fraction of the production numbers were offered this way.
This car has been relatively trouble free, in the nearly five years we’ve owned it I’ve had to replace some leaky valve cover gaskets, install a pair of rebuilt cylinder heads due to leaking valve stem seals, replaced a clutch, water pump, battery and power steering pump. For it’s age that’s pretty good.
However the tires (which we bought when we bought the car) are getting to be just about bald, not to mention that they’re starting to crack due to age. Worse than that, the suspension bushings have been subjected to oils and other agents which have caused them to break down. There are also a number of other little issues which need to be addressed just to dress the car up a bit and make it more usable (and safe) as a daily driver.
So, thus begins project “late model restoration”. I’m going to address all of the serious mechanical issues, as well as make a few improvements so I can take pride in the car. That last part is key, because I keep entertaining the idea of selling the car, but if I’m being honest we can’t afford to replace the car right now, and there isn’t really anything wrong with it that can’t be easily remedied!
The first step was to wash the poor thing for the first time in many months, and repair the broken power antenna. Stay tuned here to watch the progress. You can consider the image above the “before” picture.