For the past few weeks I have been getting down and dirty writing Chef recipes for use in RightScale.
With Chef support still in beta on RightScale, and me being a complete Chef newbie it’s I’m still on the front side of the learning curve.
If you’re just getting started with Chef for RightScale, you might benefit from this quick start and some of the lessons I learned while getting started.
Mise en place
While you could just open up Notepad or TextEdit and start writing your Chef recipes, there are a few resources that will make the experience much more enjoyable.
Install Chef
The first thing you’re going to want to do is install the Chef Ruby Gem. This will add all of the libraries and binaries for Chef.
While we’re writing our recipes for use with RightScale we won’t need to worry about using the Chef Server, Chef Solo, or Chef Client, so don’t bother configuring any of those.
I’m developing on a Mac and the only suitable installation method seems to be using Ruby Gems to install. This mechanism should also work for most Linux and Debian machines which already have Ruby installed.
1
| |
Be sure that you run this as root, or with sudo or Chef will get installed at ~/.gem and won’t be in your $PATH or consequently accessible to other users.
Sharpen your knives
Now that you have all of the Chef goodies installed, you’ll have a binary named “knife”. The knife is a utility which we’ll be using as we develop our cookbooks and recipes which you’ll see later.
First though, we need to configure knife. Since we’ll only be using knife to act locally on our recipes and cookbooks we don’t need to give it legit values for a Chef server, but we do need to complete the configuration step to satisfy knife and prevent it from crashing when we use it.
To create a simple configuration file for knife, just run knife config, and accept all of the defaults.
1 2 3 4 5 6 7 8 9 10 11 12 13 14 15 16 17 18 19 20 21 22 | |
You’re safe to ignore the warnings since they only pertain to actually connecting to a Chef server, which we won’t be doing.
That’s it for installing and configuring Chef if you’re using it with RightScale!
Prepare your pantry
Once you get going with Chef you’re going to need to store your cookbooks somewhere for RightScale to find them and run them.
RightScale will use svn or git repositories, as well as simply downloading a tar or zip file, but my personal preference is to use a git repository.
The quickest and easiest way to get started with git is to head over to github and sign up for a free account.
Once you’re setup, go ahead and create the repository we’ll be using for our Chef cookbooks, and note the SSH URL to your new repository. It should look something like git@github.com:<github_username>/<repo_name>.git. Write it down or keep the browser window open so you can reference it later.
Heat things up
Now that you’ve got your mise en place it’s time to get cooking for RightScale with Chef.
Create your repo
The first step is to get the file structure of your Chef repository setup. You could just take a look at an existing repository like the opscode cookbooks, or RightScale’s public repository and replicate it manually, but there is a better way.
Clone the OpsCode repo
OpsCode, (the folks behind Chef) have conveniently provided a public github repository that represents the skeleton of a fully operational Chef repository. You can clone this repository to get you started.
1
| |
Once you’ve cloned the skeleton repository, you’ll want to configure git to use the new github repository we created earlier. Here’s where you’ll use the SSH URL I told you to take note of. Substitute that URL where you find <ssh_url> below.
1 2 3 4 5 | |
Create cookbook
With the repository skeleton all ready, we’re going to want to create our first cookbook and add a recipe to it.
Creating a cookbook is our first chance to use our freshly sharpened knife, like so.
1
| |
This should create a nice new cookbook skeleton directory at <path_to_your_repo>/cookbooks/my-first-cookbook.
With that done, let’s put our first recipe in the cookbook. Using your favorite IDE, create and save a file named helloworld.rb inside the new cookbook directory.
EDIT: Many have correctly pointed out that the hello world file should actually go in <path_to_your_repo>/cookbooks/my-first-cookbook/recipes. Thanks all for the feedback!
1
| |
With the recipe created, we need to add it to our metadata file so that Chef and RightScale can know it’s there. Here’s a copy of our default metadata.rb file. The highlighted line is added to define the recipe we’ve added.
1 2 3 4 5 6 7 8 | |
We only have one more step before we’re ready to commit our new cookbook and recipe to our new git repository.
RightScale reads the metadata to determine which recipes are available in the repository, and which inputs are available for those recipes. The file that RightScale evaluates though is a json file named metadata.json.
The contents of metadata.json are effectively the same as metadata.rb, but take heart, you only need maintain the metadata.rb file, then convert it using another Chef command. To generate metadata.json from metadata.rb just run the following command.
1
| |
You can run this command either right at the root of your repository, or inside each cookbook. If you run it from the root directory of your repository, it will convert all the metadata files in all of the cookbooks.
Now we’re ready to commit our repository and try out our new cookbook.
1 2 3 | |
RightScale Configuration
I’m going to assume that you already have some familiarity with the RightScale dashboard, and creating things like ServerTemplates and RightScripts.
What I’m going to cover here are steps are necessary to start using Chef with your ServerTemplates.
Tell RightScale about your Repo
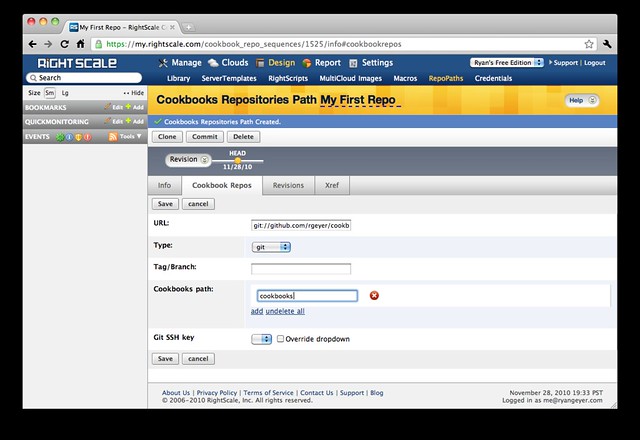
The first thing you need to start using your cookbooks in RightScale is to tell the RightScale dashboard where to find your repo. To do that, you need to create a new RepoPath in the designer.
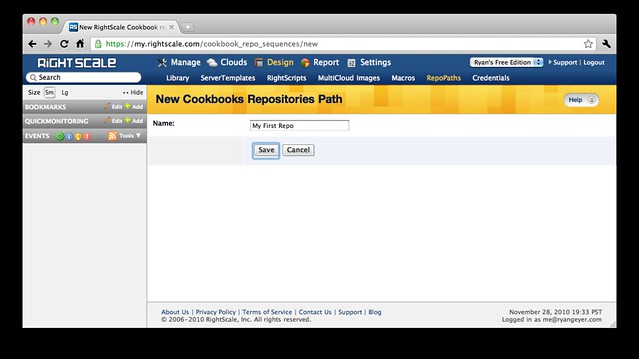
When you’re adding the RepoPath, for the URL field, supply the “Git Read-Only URL” for your repository, and make sure to specify the path to your cookbooks as cookbooks.
Add your RepoPath to a ServerTemplate
Now that you’ve added your repo to the RightScale dashboard, you need to add that RepoPath to a ServerTemplate. To do that, open the ServerTemplate you want to run Chef cookbooks on, and click the edit pencil on the Repos tab.
Then select the RepoPath we just made, and click OK.

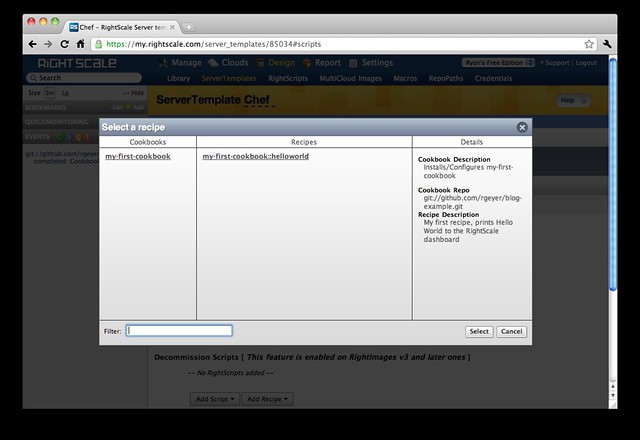
Add a recipe to your ServerTemplate
Our very last step is to add our helloworld recipe to a our ServerTemplate so that we can run it on one of our instances. Go back to the Scripts tab, and in the script category of your choosing, click Add Recipe and select the helloworld recipe.
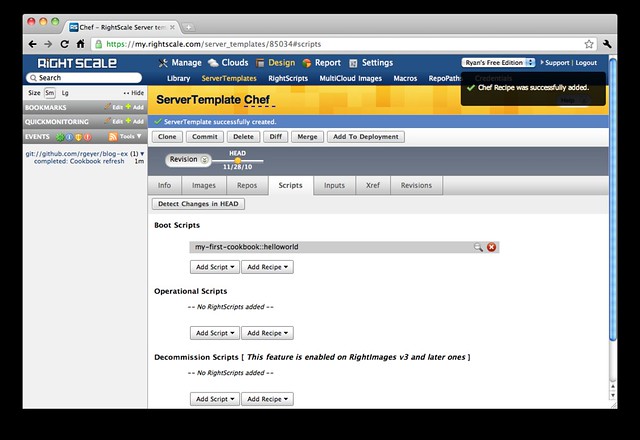
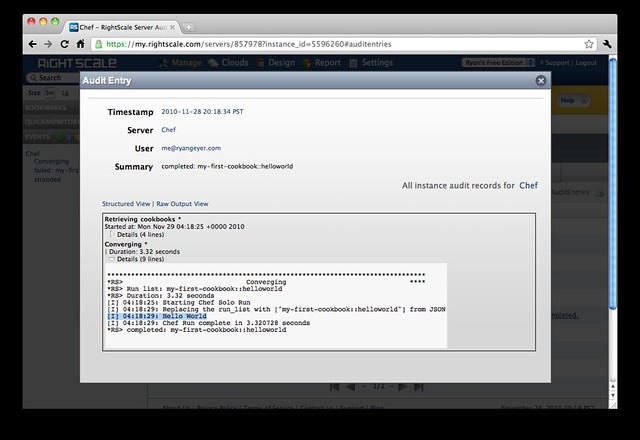
From an instance running with the ServerTemplate we just modified, we can run the recipe, and see “Hello World” appear in the RightScale dashboard.
Tips & Tricks
As stated before, Chef support in RightScale is still in Beta. Because of this there are some gotchas to watch out for.
Sanity Check Recipe
If there are any syntax errors or anything else amiss in your repository, you’ll find that not just the cookbook or recipe which you’re working on is failing, but absolutely every recipe in your repo (or any other repo that’s part of your RepoPath) will fail with this super informative error message.
1
| |
Of course, you can also get that error message if you have some other problem in the recipe you’re working on.
Because of this I find it useful to keep a “smoke test” recipe in my repo, and assigned to the operational scripts on my ServerTemplate when I’m doing Chef development. This recipe should be something simple that you know will always succeed, assuming that everything else is in order.
The helloworld recipe that we created in this exercise is actually a perfect choice for this purpose.
Taste Test
So there it is, everything you need to know to get started using Chef on RightScale condensed from my few weeks of experience. I hope it helps you get started configuring your server instances with Chef, which brings a whole new dimension of power and flexibility to the RightScale ServerTemplates.
I’m excited to see how Chef support progresses and makes it to production status.
If you’re hungry for more info, check out some of the early documentation available about using Chef in RightScale here.


